7 Easy steps I use to close a project effectively (Steal my checklist!)
We tend to spend lots of time talking about project set up, having a fully-thought through business case, or all the stuff you have to do while the project work is being done. But there’s another area that is arguably as important, if not more so than those: how to close a project.
I’ve closed out lots of projects in my 20+ years career as a project manager. One project in particular was difficult to close and sticks in my mind as there was no one to hand it over to, so I sat with it for ages.
Others have been a breeze to close down because I’ve learned from the experience and set up a decent handover process! Of all the project management processes, closeout is probably my favorite because it’s the final box to tick and it’s so satisfying to know that you’ve finished.
In this article we’ll take you through the 7 steps for closing a project so nothing gets forgotten and the project can be wrapped up tidily. Then you can learn from my mistakes and make sure you can move on from your projects.
The risk of poor project closure
If you don’t finalize and hand over the project to the operational teams effectively, you risk:
- Support and operational teams not knowing what they are supposed to be doing with what your project has delivered
- Ineffective benefits tracking
- Poor levels of training and support for users or customers
- High learning curves for users, which affects their ability to work in the new environment
- Project resources not being adequately redeployed.
There is a big prize at stake: the project’s benefits. Wasn’t that why you did the project in the first place? If your project customers can’t understand or work with what you have given them, they won’t use it. If they don’t use it, the organization doesn’t receive the planned benefits.
And if the planned benefits aren’t delivered, the whole project was kind of pointless, right?
The project closure process isn’t difficult, but it does make a big difference to how you feel about the work, so it’s worth doing right. There are a lot of administrative tasks to get done, and you’ll finish the job feeling like you’re leaving everything tidy.

The importance of project closure
At the end of your project you should be thinking about wrapping up your work and handing it on to someone else. Otherwise you’ll never get rid of it, and you’ll be the Go To person for ever and a day.
Trust me, I’ve been there. There are reasons why I don’t know a lot about the exact support documentation any longer: get someone else to write this or you’ll be the subject matter expert forever!
A good project closure document helps that immensely. First, it points out exactly what your project objectives were. Then it describes the success criteria you specified in order to meet those objectives and what you did to meet them.
Not sure about success criteria? Check out my definitive guide to project success criteria.
Steps to close a project
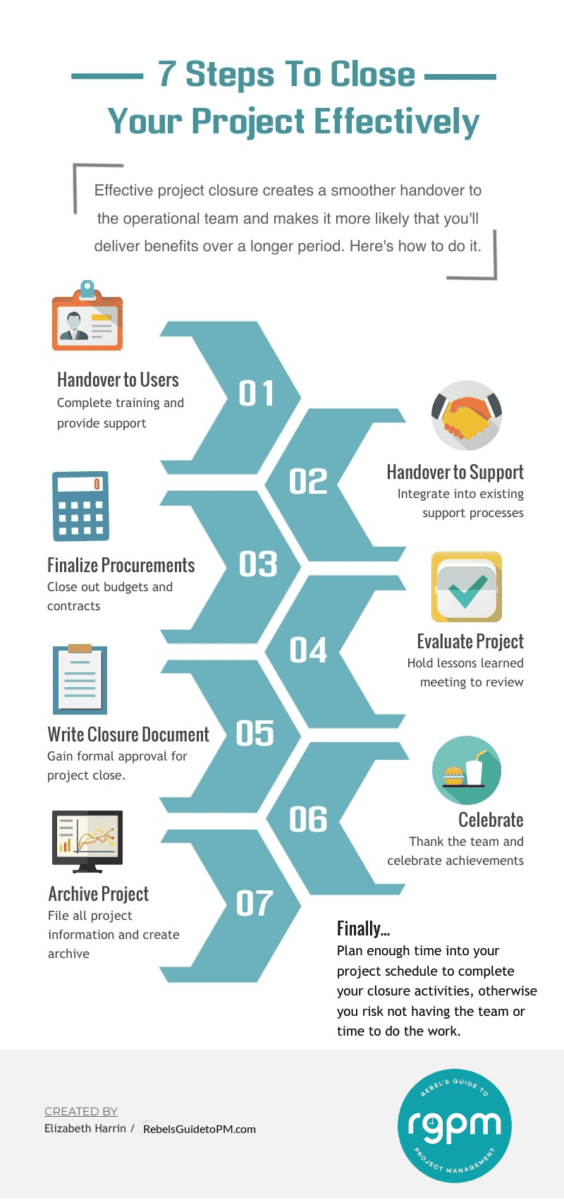
Let’s look at the 7 steps to close a project. Scroll down for an infographic that summarizes these steps. You can print it out if you like, and use it as a reminder for when the time comes.
Step 1: Handover to users
Take a look at the project plan and see what you should have completed for the users. Make sure the operational team get everything they need to make the project a success from their perspective.
This includes completing any training, providing full documentation and letting them know how they can get support from now on.
Pro tip
Make it really clear that they don’t get support from you (have I made this point enough already??). You’ll be moving on to a different project and it isn’t feasible or desirable that they should come to you in the future for advice on how to use the things you delivered.
Step 2: Handover to support
There’s another handover step to complete, and that’s the handover to support. As we mentioned above, the users need someone to ask for help and advice (because it isn’t you) as they move forward using the deliverables from the project.
The easiest situation to think of is with a new IT system: they need to be able to ring the service desk and for the person who answers to know about the new system, how it works and how they can troubleshoot common (and more advanced) problems. However, it’s the same regardless of what you are delivering.
Built a new building? You’re handing over to the facilities team who will run the building and be in charge of maintenance going forward.
Done a process improvement? Your handover is to the person responsible for that process, including all the process maps and documentation so they can train new starters.
Another thing to put on your checklist is giving them access to the project documentation so they can see how you got to where you did.
Handover information to document
Use the project closure document as a way to record relevant information for the operational team by form of a handover.
You’ll find that every project is slightly different and what you need to record changes from project to project. So this section is deliberately vague but it might include:
- Info on the suppliers you are using for support and maintenance going forward.
- Contact details of relevant internal subject matter experts.
- Any outstanding tasks or action items that the operational team are going to have to pick up.
Remember to sign and date the project closure document, and get all the other important stakeholders to do the same, so you have a paper trail for audit purposes.
The closure document gives you a physical record (even if the signatures are electronic) of acceptance into the business by the sponsor and team, so you can move on with a clear conscience.
Step 3: Finalize procurements
‘Finalize procurements’ is PMI terminology for the project closure phase (you’ll never hear anyone say it in real life) but it simply means making sure all the bills are paid. Formally close out any vendor contracts and process any outstanding invoices. Record where there were any variances and why these happened.
If you saved money, make a note of how that happened — these are all good lessons learned for the future and will feed into your lessons learned documentation (more on that later).
Shut down the cost code for your project budget or tell Finance that nothing more will be charged to the project. Make sure resource allocations and timesheet entries are being billed to somewhere else.

Step 4: Evaluate the project with a retro or lessons learned session
How did you do? Look back over your project plan at what you were supposed to achieve, and how you were supposed to do it. Did you do it all? If not, why?
Perhaps you had change requests that forced you to approach project outcomes differently. Perhaps your client changed their mind or the sponsor realized a different direction was important. Perhaps your estimates were worthless.
Capture it all.
I have a complete guide on project lessons learned meetings, but here are a few quick tips before you go deep into the topic with that article.
- Invite the right stakeholders, even if that means doing a couple of meetings and consolidating the results.
- Talk about project deliverables and the success of those as well as the success (or otherwise) of the project delivery process. Did you achieve everything in the project scope?
- Did you complete the project on time? Sometimes this doesn’t matter, but if deadlines are important to you, focus on those.
- Think about the entire project lifecycle: how were things at the beginning? Did it get better towards the end? How did the execution parts go?
Project teams need the opportunity to debrief, so don’t forget this step. If you can’t remember what happened, go back to your project reports and use them for inspiration so you can be prepared for the call or workshop with your team.
Need help with leading the meeting? My free lessons learned agenda template will help you structure a meeting to carry out your project review.

The reflection and evaluation step is really useful for future projects. Your next project should start with a review of lessons from past projects.
Step 5: Write the closure document
The project closure report is where you document the headlines and details of all the things that you did (or didn’t do). Pay particular attention to variances. Use my template project closure document if you need a starting point. Don’t reinvent the wheel when I have already created it for you!
What goes in a project closure document
The easiest way to create the document you need is to use a project closure template.
Do you need one? There’s one in my Essential Project Documents bundle.
In the document, explain what you set out to do. Document the project timeline expectations and what you actually delivered to. State the budget and what you actually spent.
Record what you did met the success criteria specified during project initiation or in the business case. Stay factual and add justifications where you have a valid justification (which would be a change request). This is not the place to whine about why you are three months late or massively over budget.
To make it clear to everyone concerned, I add a column that shows the variance from the target i.e. how far off you were from meeting the success criteria. That, of course, assumes that you exceeded them or didn’t hit them.
If your project management skills are simply awesome, you can write “n/a” in the variance boxes to show that you came in exactly on target.

Step 6: Celebrate!
Most of the work is done, but one final thing remains: it’s time to celebrate what you and the team achieved!
It would be great to go out and do something special to mark the completion of a project, but these days with virtual teams, budget pressures and the requirement to quickly get on with the next thing, celebrations get pushed aside.
Don’t let that happen to you. People need the recognition and appreciation of a thank you. Even if all you do is send out handwritten cards, make sure to mark the moment somehow.
This step provides a sense of emotional closure. The team is disbanding, and you might have worked together for over a year and grown close. There’s a sense of trepidation about what happens next and you’ll all likely go on to different, future projects which won’t involve working together.
Make space to notice and acknowledge that.

Step 7: Archive the project
Finally — the final thing to do — is to archive all your project files. Tidy up your emails. Finish off any version control for documents that you haven’t already done. Save everything off your desktop and make sure it’s on a shared drive somewhere so that project managers in the future can find the records.
Update your project management software to say the project is closed and make sure all the tasks are ticked off so people will stop getting automated alerts.
This is an important step because often projects are repeated. Or, if the same project isn’t done in exactly the same way, there will be some kind of change initiative in the future that requires a lot of the same information. When you can easily find the files, you can save your future self (or someone else) a whole lot of time.
Read next: What to do when your project closes early
Project closure meetings
The project closure meeting is the place to formally discuss anything you need to — in my experience you have it before creating the document, so you can record the relevant feedback in there, but you could also do a draft of the document and then present it at the closure meeting.
At the end of your project closure template you can record anything else that came out of the project closure meeting.
Your next steps
- Book the project closure meeting
- Make sure you’ve got some criteria against which to close the project: how are you going to know that it’s finished? And more importantly, will stakeholders accept that it is finished?
- Make a plan for handover to the users and operational or support team. If you need to create assets to handover, build time into the schedule to do that.
- Book a celebration for the team! You can do it now. Why not give people something to look forward to?
Read next: 15 Ways to Celebrate Success at Work
